
"The Boom Cannon fires devastating shots but takes a while to reload. Even the strongest armor is no match for the Boom!"
 |  |  |
| Level 1 | Level 2-5 | Level 6-9 |
 |  |  |
| Level 10 | Level 11-14 | Level 15 |
Summary
- The Boom Cannon is the sixth defense to unlock in the game.
- The Boom Cannon is a long-range, single shot defense that deals very high damage per shot, but with a slow rate of fire.
- The Boom Cannon is one of the strongest defenses in the game and is very effective against high health troops, such as Tanks or Heavies.
Offensive Strategy
- When attacking Boom Cannons, be sure to either destroy them upfront with a Barrage orArtillery, or limit your time in range of them without them being shocked. A Boom Cannon picking off your large units can ruin an attack.
- They can be ignored if massed infantry is used.
- Boom Cannons have a long reload time, so they can easily be taken out by a group of smalltroops.
- It is possible for Tanks to avoid the shots of a Boom Cannon on the opposite side of theHeadquarters unless it is right up against the Headquarters. If there is even one space between the Boom Cannon and the Headquarters, your Tanks will be out of range on the opposite side if you maneuver them correctly.
- However, if you have a large amount of Tanks, some will get pushed within range of the Boom Cannon.
- Because the Boom Cannon targets the nearest troop, you can protect Tanks from Boom Cannons by using Riflemen or Heavies.
- Critters can do a very good job distracting a Boom Cannon for a period of time especially if the Boom Cannon is protected by few other defenses; this can be an alternative to using Shock Bombs if Shock Bombs become too expensive.
Defensive Strategy
- Once a total of 4 Boom Cannons are available, it is effective to place them in a diamond or square formation in your base well distanced so that it covers as much of your island as possible.
- On the other hand, you may want to place them all close to your Headquarters to prevent attackers from avoiding certain Boom Cannons entirely simply by attacking the base from the opposite side.
- Do not place your Boom Cannons in front of all your other buildings like many people do. Boom Cannons are most effective when they are able to take advantage of their long range and target attackers' troops for long periods of time.
Upgrade Differences
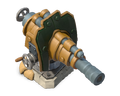
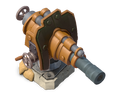
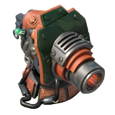
- Initially, the Boom Cannon is a gray structure with a stone base surrounded by sandbags. It has brown plating, valves on both the side and the back, as well as a long barrel.
- At level 2, the Boom Cannon's barrel turns slightly darker, but this is hard to notice. The brown highlights also turn darker, but this is easier to see.
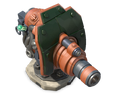
- At level 6, the Boom Cannon gains a thicker barrel and slightly darker colored plating and barrel. The sandbags around the base are removed. The barrel receives an orange band around it. The shield increases in size. The side valves are removed.
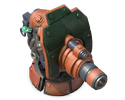
- At level 10, the Boom Cannon gains a metal base, an even thicker barrel, tubes at the back, and darker colored plating. The general color scheme turns to a reddish-brown. The back valve disappears.
- At level 11, the Boom Cannon gains a heavily armored base. Red metal plates are seen on it.
- At level 15, the Boom Cannon's barrel is much larger, and it gains steel ventilation on top of it, as well as a few layers of red metal plates between the steel ventilation plates and the barrel. A wire can be seen connecting the barrel to the back of the Boom Cannon, as well as a fiery glow within the barrel itself.
Trivia
- When it fires, the Boom Cannon's barrel seems to retract in a similar manner to the Cannon. However, the valve does not.
- The Boom Cannon's shell appears to leave an explosion similar to that of Artillery. Despite this, no splash damage is dealt.
No comments:
Post a Comment